


How to Make a Quick Italian Pizza Dough

Updated: Sep 23
A practical guide to making and baking an authentic Neapolitan pizza dough quickly and effortlessly, skipping the long waiting time for proving. Perfect, quick and easy pizza even kids can make!
Prep: 20 min // Bake: 15 min

DISCLAIMER: This post contains affiliate links. By clicking and purchasing through the links, I earn a small commission at no extra cost to you. This allows me to keep the site up to date and do more research on food and travel. Thanks for reading!
On a recent trip to Southern Italy, my friends and I visited a charming agrotourism settlement in the hills of Campania, the birthplace of authentic Italian pizza. We took classes to master the art of traditional pizza-making and returned home eager to get our hands dirty and eat more. However, for a busy family living in a fast-paced megacity, it’s not always easy to find fresh yeast (one of the key ingredients for authentic dough) or convenient to wait for its fermentation.
The traditional fresh yeast method requires at least a 6-8 hour fermentation to give your pizza base its distinct flavour, chemistry, and bubbly, fluffy texture but can go up to 48-72 hours for more depth of flavour, as I explained in the Neapolitan Pizza Dough recipe post.
After experimenting a bit, I came up with a set of ingredients and an ultra-fast method to make authentic Italian pizza dough in about 30 minutes with surprisingly satisfying results!
What’s the secret to a quick and easy pizza dough?
Secret #1: Yeast. Typically, fresh yeast gives the dough its big flavour. However, fresh yeast needs longer to activate, and since we're aiming for quick proofing, we choose dry yeast instead. There are two types of dried yeast: active dried and fast (or easy) baking. Using active or fresh yeast and reducing the fermentation time due to haste will likely cause the yeast to activate in your stomach, leading to discomfort and burping; not ideal. But fast-dried yeast (also known as ‘easy bake’, ‘instant', 'quick yeast’, ‘fast action’) activates much more rapidly and can be used almost immediately. In this recipe, the dough is fermenting for just 30 minutes!
Secret #2: Flour. While Type 00 flours like Caputo Saccorosso (Red Bag) are built for long, slow fermentations thanks to their higher protein and stronger gluten network (see my Neapolitan Pizza Dough recipe post), that strength goes underused on a fast-track same-day timeline. It can even leave the dough stiffer and harder to stretch. But a stronger Type 0 flour (like the Purple Bag Caputo Nuvola) uses a different enzyme and gluten balance that lets it fully mature in just 4-8 hours, relaxing and extending easily even after a short rise. This makes it a better match for home ovens, which already need longer, gentler bakes than wood-fired setups: the Nuvola flour blend and gluten structure hold moisture and stay tender over that longer bake at lower temperatures than wood-fired ovens, still giving you that good, airy, puffy crust. Nuvola purple solves both problems at once: quick maturation and a light, airy crust, without the multi-day fermentation Type 00 Red requires.

Secret #3: Baking Surface. Beyond yeast and flour, if you're a serious pizza lover like me, a baking stone or, even better, a carbon pizza steel is a worthwhile investment. Steel conducts heat far more efficiently than stone, transferring it into the dough much faster, which means a shorter bake, better oven spring, and a crisper, more evenly charred base without drying out the top. Steel can also bake on your outdoor grill and holds and recovers heat faster between bakes, so back-to-back pizzas turn out beautiful and consistent.
And if you're a true pizza addict looking to level up further, consider a portable Ooni wood-fired oven for your balcony or backyard ;-) And head over to my "How to Make the Perfect Neapolitan Dough for Outdoor Ovens" masterclass post to up your game.
Secret #4: Hand Streching. Pizzaiolos highly recommend hand-stretching the dough: rolling with a pin might be tempting, but hand stretching keeps the structure intact and gives you way more control over thickness. Pro tip: trim your nails first. Check out this video for some hands-on instruction:hand-stretching techniques
Recipe
Ingredients (makes 2-3 pizzas)
For the dough:
4-5g (half sachet) fast-action dried yeast
280ml warm water
2 tsp extra virgin olive oil
1 tbsp salt
For the tomato sauce:
1 can (400g) San Marzano tomatoes or ready-made Mutti Pizza Sauce
1 tsp dried oregano (or try pizza herb mix)
Salt and pepper
Method (for conventional kitchen ovens)
Prep: If you are using pizza steel or baking stone now is the time to warm it up. The more you warm it, the better it will behave. Turn your oven on at the maximum setting (anything around 285c) and place the stone to preheat. DO NOT use the oven fan function as that would dry the dough.
Warm up (in a microwave) the 280ml warm water (use a measuring jug), and dissolve the fast-action dried yeast. Set aside.
Mix: In a big bowl, add the flour with the salt and make a well in the middle. Pour the dissolved yeast water and the olive oil into the well and start mixing with a spatula or your hand (in a circular motion) by adding water little by little until it starts forming a rough dough. It shouldn’t be very soggy, and neither too dry (you need this humidity for a soft crust when you are baking with a regular home oven), so depending on the quality of flour you’re using, you might need more or less than 200ml water.
Dissolve the yeast in water Add olive oil for taste and crispiness
Knead: Transfer the dough to a floured surface and knead for 5 minutes until it's smooth and elastic. Split it into two (or three - around 260gr) equal-sized balls and set aside to rest in room temperature until you prepare your toppings and sauce (anything from 15 to 30 min will help soften and smooth the dough).
Make the tomato sauce: My favourite special sauce is to add 1 can of San Marzano tomatoes in a nutri blender with salt, pepper and oregano or fresh basil leaves, and whizz until it’s a smooth pizza sauce. Make a big batch and store it in the freezer. Will last for months. Alternatively, mix the ready-made Mutti pizza sauce with 1 tbsp of oregano and salt (or the pizza herbs mix).
Shape: Hand-stretch each ball on a floured surface to about 15-20cm in diameter. Keep pressing and expanding the pie with your fingertips until it is roughly about 25-30cm diameter, indenting a thicker crust around the edges. I like the middle very thin, around 2mm and the edges thicker, around 5-8mm.
knead baby knead forming balls hand stretching the pies
Bake the base: Not every oven bakes the same, so you might need to adjust the timings. This recipe is for baking in a conventional home oven (280c) - do not use the fan function, it will dry the dough quicker. Carefully transfer the stretched dough onto a pizza peel (or use anything that can aid in this purpose) and spread your tomato sauce. Carefully place the pizza on the baking stone/steel and bake at the bottom of the oven for an initial 6-8 min. This is done to allow the dough to bake inside out without burning the toppings and the cheese.
Tomato sauce Oops
Bake the top: Carefully remove from oven (including the stone), add the rest of your toppings and mozzarella and bake on the top shelf for another 5-6 min. Remove from oven, lift to check if you are satisfied with the middle ground baking and serve.


Shopping List
Measuring Jug: You will need a 1-litre glass jug (so you can warm up water in the oven) or get a Pyrex Jug Set of different sizes which will be useful for other meal preps.
Dough Scraper: You need a dough scraper (like the MasterClass brand) to aid in cutting, scraping, lifting, and shaping the dough.
Pizza stone: pizza stone is the cornerstone of baking at home. And the more you let it het up in the oven, the better the result will be. If you are serious about pizza, I would suggest going for a combined stone+peel set.
Bowls for toppings: I found this 6-pack of enamel bowls the perfect size for the sauce and toppings needed for the 6 pizzas you will make following my recipe. Alternatively, there is a 6 Compartment Trays Detachable Topping Station which has a lid and keeps everything nice and tidy plus it can be stored in the fridge.
Pizza Peel: I recommend a perforated aluminium Pizza Peel because it's lightweight and easy to slide, turn, and retrieve pizzas from your stone without burning your hands taking the stone out. The perforations also mean a perfectly cooked pizza every time as steam can evaporate to reduce sogginess while excess semolina falls away before serving.
Pizza Serving Board: There are quite a few options out there but I prefer the good old rustic looks of a round wooden pizza board.
Pizza Cutter: There are the classic wheel cutters (I like the Boska for the rustic looks and the Oxo good grips for their quality) and there are pizza rocker cutters which will rock your world by being so stylish and cutting straight through like a hot knife through butter.
Flat bottom ladle: this is for equally spreading the tomato sauce over your stretched pie. Get this one with the spout!
All the equipment you need in photos (swipe left - click to buy):

Measuring Jug 
Scraper 
Mutti Pizza Sauce 
Mutti San Marzano 
Topping station 
Enamel bowls 
Pizza peel (perforated) 
Wooden serving board 
Pizza cutter 
Pizza cutter 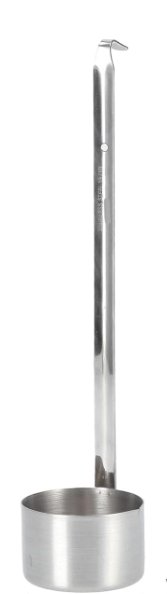
Pizza Ladle with spout


Best tech bro good shap
Μπραβο!!!!
Πολυ χρήσιμες πληροφορίες και εξαιρετική συνταγή!!!